Home Kitchen gadgets and appliances reviews Garbage Disposals Garbage Disposal Installation: 2023 Ultimate Guide

Garbage Disposal Installation: 2023 Ultimate Guide

If you want to spend less money during the renovation you have to DIY as much as you can. Our Great Livings editorial team asked several experts — plumbers and electricians, to illustrate the ideal process of garbage disposal installation. We also collected data from various sources across the web and wrote this guide.

Hope that you will find it useful. Don’t forget to write a comment, it is important to us to understand that we do the right job.

The garbage disposal which is installed under the sink, can be found on sale under the name “Disposer”. It is installed independently without any problems, and for this simple operation it is not necessary to call a plumber.

Related Post: The Best Garbage Disposals For 2023 Reviews

Related posts

The principle of the garbage disposal design

In a typical assembly, the disposer device has the following components:

  • connector for the sink
  • allen key for assembly
  • outlet flange mounting flange
  • main flange
  • exhaust tap
  • separate rubber gaskets for tap and neck
  • capacity with a grinder and electric drive
  • pneumatic button with a hose (or other switch)
  • cork for filling the sink

Depending on the modification of the model, components can vary in quantity, as well as in appearance and design. Therefore, during the purchase, it is worth spending time and checking the availability of all elements according to the insert or instructions.

Since the absence of some parts of the grinder can lead to a critical result after or during connection.

What a garbage disposal consists of

Preparation before installation

After examining the contents of the delivery kit, it is worth paying attention to some installation details, more precisely, what should be additionally purchased for connecting the disposer.

 Firstly, rigid smooth-walled fan pipes will be required, since during waste disposal their residues can accumulate on the surface of ordinary corrugated plastic siphon tubes. As a result, waste disposal is difficult because it gradually narrows the hole in the pipe. Following this, an unpleasant odor appears, from which even the presence of a siphon does not save.

Secondly, you need a sink to which it will connect. The diameter of its drain hole should be about 3.54 inches, according to the modern standard. Otherwise, the connection will fail due to product incompatibility.

Required tools and materials for garbage disposal installation

You may also need a circuit breaker, or an outlet located under the sink, with additional protection against moisture. Otherwise, the risk of spoiling the device on the first day of operation increases.

In rare cases, you can take additional measures, for example, increase the drain hole in the sink if it is made of stainless steel. This operation will require an additional metalworking tool. As for the enameled sinks and artificial stone products, it is impossible to change their design for the disposer. Before installing the disposal, be sure to read the instructions, even if you had to install a similar device already. Design features may cause you difficulty already during installation and connection.

Before starting the installation of the disposer and all its parts, if it is installed on an already actively used sink, it is necessary to disconnect the sewer pipe from the existing siphon. Then you need to remove all the fasteners and siphon from the sink, and clean it before installing new elements. Only then can installation be started.

If the sink is new and has not yet been built into the design of the table, then it will be much easier and faster to install the dispenser by first turning it into a convenient position.

Installation scheme

If you briefly describe the connection diagram of the kitchen dispenser, the following steps can be distinguished:

  • installation of a separate outlet with grounding
  • fixing the chopper under the sink
  • connection to the sewer pipe
  • installation of a switch
  • checking the system for leaks and performance


For a better understanding of the connection steps, see the images below.

Garbage disposal installation scheme

Garbage Disposer Connection Steps

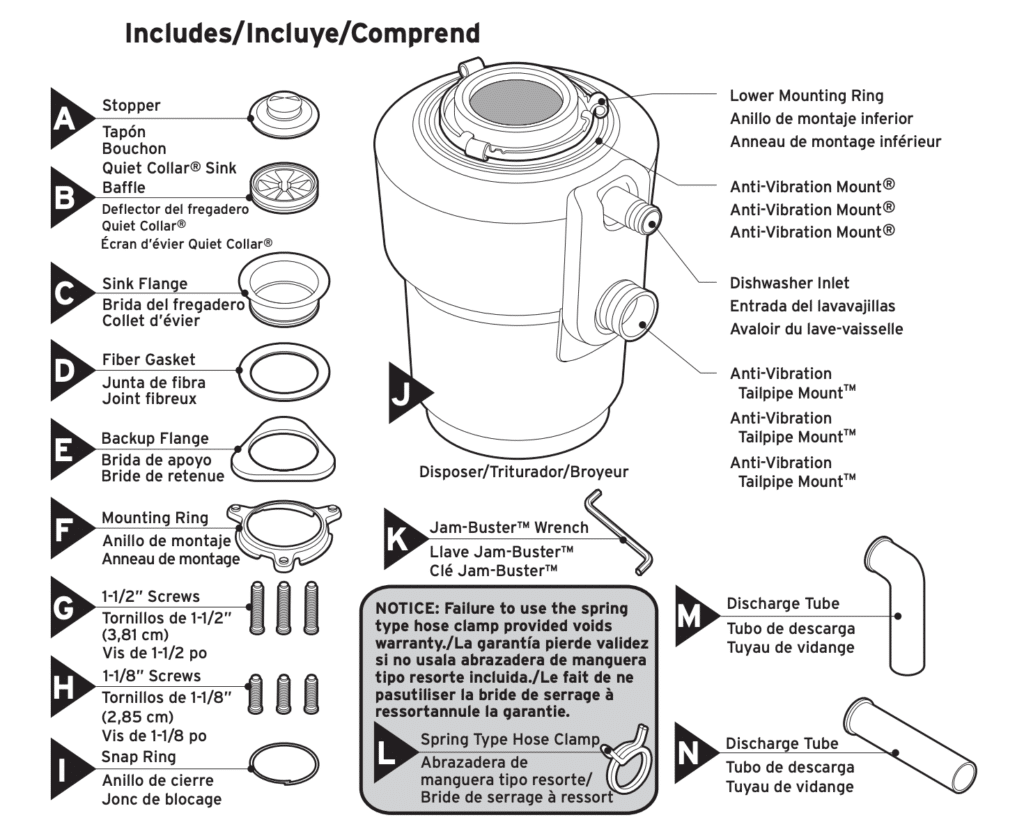
Step 1. When all the preparatory work is done, a rubber gasket (seal) for the flange is placed on the outside of the sink, which is necessary to avoid leaks. A flange is mounted on top of it, and its narrow part is placed in the drain. From below, under the sink, a noise-spray insulator made of rubber or cardboard is installed on it.

 The flange itself is attached to the sink with a mounting bracket. Most often, these are expansion bolts, complemented by the second part of the mount, which presses it to the sink. To continue work, you need to remove the protective metal ring, and then fasten the lock.

Step 2. After the fastening of the flange is completed and the lock is installed, they proceed to the connection of the disposer. Depending on the model assembly method, additional tools may be needed at this stage, for example, a hexagon, with which the device is suspended by a lock.

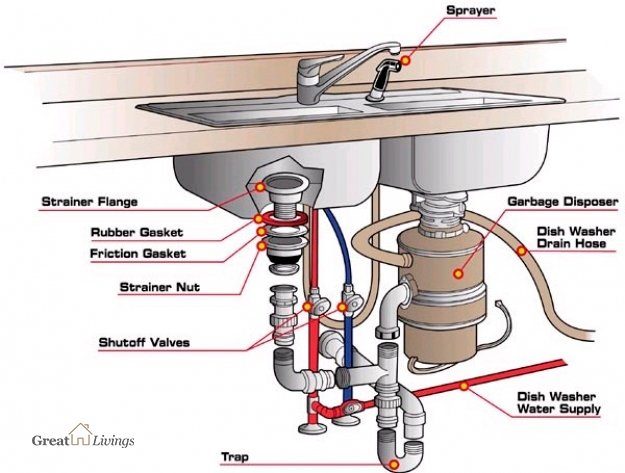
Step 3. Upon completion of connecting the device to the sink, it is connected to the sewer. For this, a siphon with pipes is required (see the specifications in the instructions) and a fastening from the kit. It can be plastic or rubber with a special clamping ring made of steel.

If the kitchen has a dishwasher, it should be connected to the disposer. For this, a special hole with a plug may be provided in it. When connected, it will need to be removed (knocked out) with a screwdriver.

Step 4. When the siphon assembly is completed, a trap (if any) and a plug are installed in the hole in the sink. At the final stage, the device is connected to the mains, water is collected in the sink, the plug is removed, and leaks are checked.

If they are not, then the connection is made correctly. After that, you can begin to test the health of the disposer.

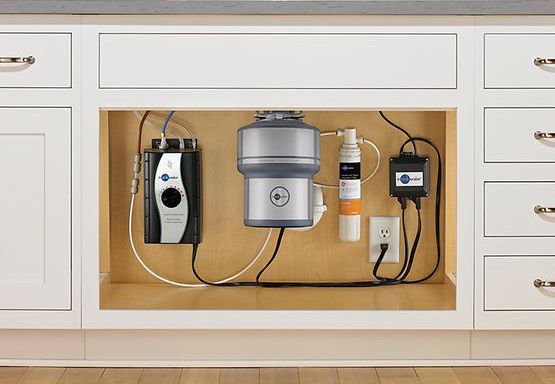
Then you need to install a pneumatic or electronic switch (button), if there is no remote control. This will require a tool and drilling skills on the material from which the tabletop of the table or rack is made, where the chopper is installed. After the hole for the button is ready, it can be installed and fixed on the back of the countertop.

If a pneumatic switch is used, a complete PVC hose is connected from the bottom of the dispenser to the tap and the installed button.

Do not forget that the garbage disposer is an electric device. It requires power. At the same time, it must coincide in voltage with the technical characteristics of the device, have grounding and protection against moisture. If not, contact a professional electrician to help organize it.

Video instruction for connecting the food waste disposer

Subscribe
Notify of
0 Comments
Inline Feedbacks
View all comments