How to Install a Kitchen Faucet: A Handbook for the Masses
Last Updated:
An old leaking faucet is big kitchen trouble that may exasperate you. You must replace it and install a new faucet as soon as possible to get out of this frustration. Even if you want to update the old faucet with a modern one, you may go with it.
But the question is ‘How to install a kitchen faucet’ as it seems to be a technical task. Is there a particular need to hire a professional, or can anyone do it? Yes, there is no need to wait for plumbers; anyone can do it quite easily. Just muster up the courage and get a handful of experience to replace and install kitchen faucet.
So, why to tolerate annoying faucet when you have a simple handbook on ‘How to replace kitchen faucet’ and all guidelines about ‘How to install a kitchen faucet.’
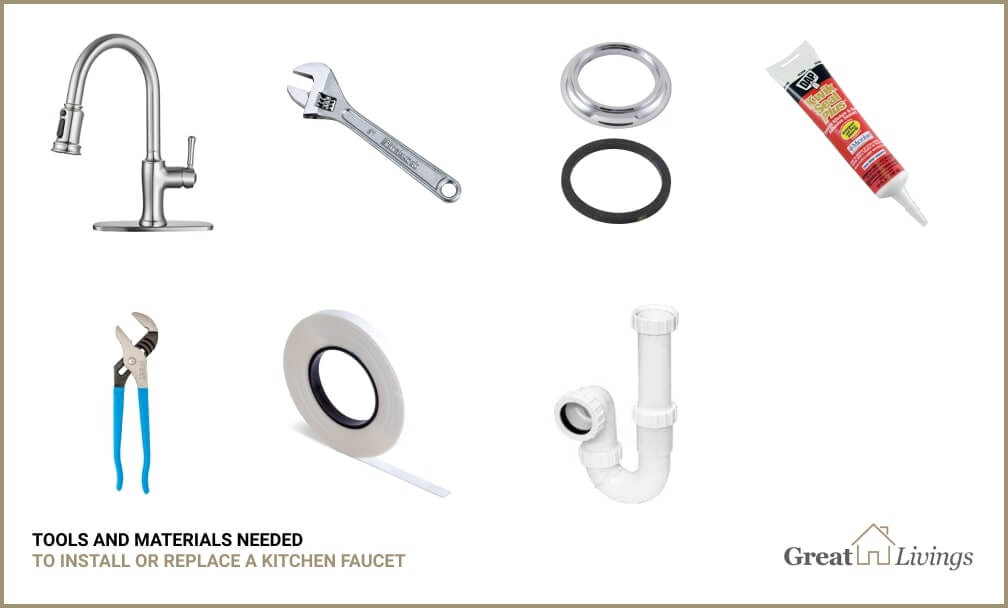
Just have a look at what are the tools you need to accomplish this task and get started!
How to install a kitchen faucet – Remove old faucet first
When you are installing a new faucet, you must have an idea that removing already fixed faucet, although out of order, is first to work on. So, manage to disconnect it and make sure that you have a helping hand at your side for uninterrupted removal and installation.
Before standing on the sink, confirm that you have the required tools and all the essential stuff to detach old corroded faucet. Counter check your toolbox with the given list of tools, and if you find any missing, rush to the hardware store and make sure all of the tools are in your access.
Tools and materials needed to remove an old kitchen faucet and install the new one
So, here comes the foremost step of removing the old faucet. Follow these steps one by one, and you will see the faucet will be in your hand.
First of all, clear the sink underneath by dragging all the buckets or anything you have in this space.
When you are done, lie under the sink and shut off the cold and hot water valves and ask your helper to release the pressure of the faucet by opening it.
Now disconnect the water lines with the help of an adjustable-wrench. Unscrew the nuts. You may try with fingers, but if they are destroyed enough, go for wrench or pliers and loosen them carefully.
Some of the faucets also have side sprayer, and it depends on what type of faucet you are using. If you want to replace it, unscrew its nuts too.
Check for the p-trap, and if it is old enough to be changed, also separate it.
Now expurgate the connection and pull the faucet out. The old worn faucet will be in your hand, and half of your task of faucet installation will be accomplished.
How to replace kitchen faucet – A simple yet workable protocol
Now is the time to install a new faucet. As there are different styles of faucets available in the market, so make sure you have bought desired, touchless, or a regular faucet.
Check the sink and faucet holes: First thing before fitting faucet is to confirm that the holes in the sink and the faucet are suitable. You need gaskets and caulk at the base of the hole to make a proper seal as if there are no extra holes, the only gasket would be enough, and you don’t need to use caulk while if you adjusted deck plate to manage hole, make a proper seal by using caulks.
Set the faucet: One crucial thing you must consider while installing a new faucet is that you must read manual or instructions provided by the company. By doing so, you will get an idea of the specifications of the new faucet and what accessories/hardware they are offering. When you read it carefully, place the faucet at the sink and attach it to the hardware (gasket). It will prevent leakage from the sink. So, carefully attach it at the base and make a proper assembly.
Tighten up the hardware: When you have placed faucet and gasket at their required place, pick up the screwdriver and tighten it up while lying under the sink. Make sure that faucet is at the accurate position because once you tighten up the screws at the wrong place, there would be chances of misalignment that would result in leakage.
Attach supply lines: Now attach the supply lines of cold and hot water (that you detached while removing faucet) while keeping the valves off. Tighten up the nuts with an adjustable wrench and don’t overtight if you have plastic nuts in your faucet kit. You may use fingers in case of plastic nuts. Are you done with attaching supply? Good! Its almost near to finish the installation of the faucet. Just a few steps left.
Adjust the sprayer: As most of the faucets have sprayers with them, take your sprayer out of the packing and place it on the sinkhole. Mount it correctly and adjust it in the right position.
Give extra leakage protection: Now you have to make it leakage free. Take the sealing tape and give additional leakage protection by using at supply line joints. In this way, the chances of leakage would be minimized.
Check the leakage: After carefully analyzing that everything is fine, open up the water valves slowly and check for the leakage. You may also use a piece of tissue paper if you find it doubtful after checking with your fingers. When you are sure that there is no leakage even at the connections, open the valves fully for 2-3 minutes and let the water run from the newly installed faucet so that pipe may get clear from any dust or debris.
Congratulations, you have done it! Yes, believe it, you have successfully accomplished your task with little effort, and now you must be fully trained when you undergo two to three times.
Now, is the time to pack up your tool kit, say thanks to your partner and make some coffee!


 – Reviews & Buying Guide")

 – Reviews & Buyer’s Guide")