How to Install a Wall Oven: Complete Guide and Tips
Last Updated: Wall ovens offer a different set of benefits and versatility to homeowners than traditional ovens. Primarily, this is due to the unit itself being separate from the stovetop. This allows for unique customization when it comes to placement and positioning throughout the kitchen.
Getting the best wall oven can be one of the most exciting changes to a kitchen you could make. It completely switches the dynamic of a kitchen and brings something new and refreshing to the stale and standard stylings of most kitchen layouts. However, installing a wall oven is not something that can simply be done without a little preparation and planning.
Let’s talk about wall ovens, what they are good for, and how you can install one yourself in your kitchen.
Wall ovens allow the homeowners to separate the oven from the stovetop as a single unit. This might seem a bit trivial at first, but it can actually come with quite a few benefits. For example:
Wall ovens can be safer, as they don’t require you to bend over too far to get hot items in and out of the oven.
The height of the oven can be adjusted to fit your personal needs.
The placement of the oven can be flexible, and you are not bound by the limitations of a stovetop oven combo.
These are just a few of the ways that wall ovens can make life a bit easier. With that in mind, let’s talk about the process of how to install a wall oven.
How to Install a Wall Oven
First things first, let’s talk about safety. If you are not familiar with the use of power tools, or even basic electric wiring, you might want to consider professional installation. This is simply due to the fact that working with electrical wiring and heavy equipment can be dangerous, and safety should always be a priority.
Now, if you are pretty familiar with basic DIY ‘handy’ work, then you should be fine to go ahead with the wall oven replacement/wall oven installation. If you already have a wall oven installed, you should go about removing the wall oven currently in place. Here is a brief overview of how to remove the old oven from its cabinet:
Remove the old wall oven if have one
You will need to shut down all electricity to the wall oven via the circuit breaker.
Remove the front door to the oven, and remove all of the wall mounting screws from the side panels of the unit.
After you have disconnected the oven, it should slide from the cabinet freely.
Gently cut the wires connecting the old oven to the electrical source in the wall.
Once you have removed the old unit and have the cabinet ready for your wall oven replacement, you can begin preparing the cabinet for the new/first time fixture.
Here is a brief rundown of how the process looks:
Install the new wall oven
The first step should always be to make sure that you have turned off the circuit breaker for the wall oven connections. This will prevent the wall oven from being turned on accidentally while you are working. This is mentioned a second time simply due to how important it is.
Find the electrical junction box behind the cabinet. This may be located inside the wall, in which case you may have to cut the drywall to gain access to it.
Measure your cabinet opening, and ensure that it is large enough to accommodate the new wall oven. If not, then calculate how much space is needed, and divide it in half. Remove that half from each side until the space is large enough for the new oven.
Take the armored cabling from the new oven, and carefully attach the wiring to the wiring connectors on the electrical junction box. This will require a right-angle clamp and careful attention to the color coordination of each wire.
Gently twist each wire from the junction box with the corresponding wire from the oven cable. Secure these wires with a wire nut once bound and twisted.
Fold the connected wires into the junction box, taking care to ensure they are well organized and neatly placed. Replace the cover over the junction box, and attach your right angle cable bracket to the cover.
Seal the opening to the junction box if you were forced to expose it through the drywall.
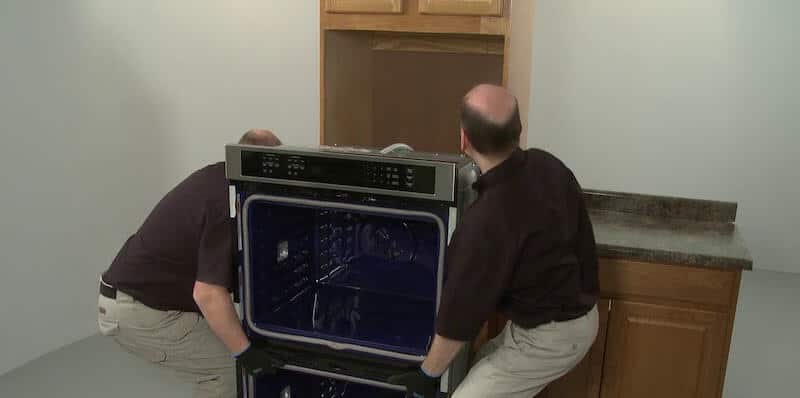
Gently slide the wall oven into the cabinet opening, and begin mounting it to the cabinet.
Attach the doors to the oven, and install the trimming around the wall oven.
Turn on the circuit breaker, and test that the newly installed wall oven works as advertised.
The process is relatively easy, and should not take more than a few hours from start to finish. It’s important to note that the process of how to install a gas wall oven is virtually identical. However, you must remember to completely turn off the gas supply, and properly secure the gas line from the oven to the gas supply when installing.
Final Thoughts
You don’t need to be a certified contractor in order to replace or install a wall oven. The process of how to install a wall oven in a base cabinet is pretty straightforward. Just remember to always put safety first, and be patient throughout each step.
Once you have fully installed your wall oven, you can enjoy all of the aesthetic, safety, and convenience benefits that come with a gorgeous new wall oven!

 Wall ovens offer a different set of benefits and versatility to homeowners than traditional ovens. Primarily, this is due to the unit itself being separate from the stovetop. This allows for unique customization when it comes to placement and positioning throughout the kitchen.