Last Updated: All the water tabs and tubing are tightly closed but still, your slippers get wet in the toilet – what’s going on? If you are failed to solve this puzzle, let me help you figure out that your toilet is leaking. Your toilet and its floor are at rot risk as leaking toilets at the base may cause a hell of the bad for your floor. Sooner or later, you would be investing much to fix your floor, and wastage of water is still the same. So, don’t rear this leaking monster and see whether your flushing toilet tank is leaking or it is the base and address accordingly.
Before stepping in the toilet with tools and materials, you have to diagnose the leakage point. Open the tank lid and pour some blue fabric softener in the tank and wait to see either it reaches the bowl or not because all the water valves are closed. After a few minutes lift the bowl’s lid and see. If blue water is there it means your toilet tank is leaking otherwise base is leaking.
How to fix a leaking toilet tank?
Constantly dripping or flushing much water in the bowl is the main problem toilet tanks face and is silently wasting water without leaving floor impression. It is the fate of every toilet and you will encounter it despite all the maintenance because it is a tank’s machinery issue that is sensitive to bear pressure and fails to work properly.
Let’s fix it out!
Check the valves and connections
First, check the toilet tank supplies and connections including the inlet valve on the ballcock, float, and the flapper as they are potential tank spoilers. Flush the tank and see either the water level rises above the overflow tube or not. If it rises, the float or inlet valve is damaged. Now you have to check the inlet valve by flushing the tank and lifting the float holding rod. If the water stops it shows the inlet valve is perfectly alright and float is causing the toilet tank to leak.
Fixing the float
You will see there is a screw at the top of the ballcock that helps to adjust the water level in the tank. If it is not stopping water in the tank you have to check float and see if there is a hole and it lies low in the water. If yes, you need to go for float and rod replacement. It will stop leaking from the tank.
Fixing the inlet valve
If tank machinery shows that problem is with the inlet valve you have to consider replacing it.
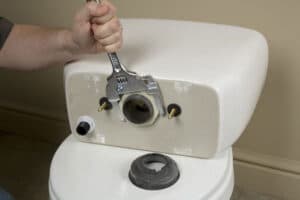
To replace the valve, turn off the shut off valve to cut the water supply in the tank and flush repeatedly to completely withdraw water from the tank. Use a sponge to dry from the base of the tank and disassemble the supply line that connects the ballcock. Unscrew the nuts holding the ballcock and lift the assembly by pushing it up.
Adjust a new ballcock at the place and tighten it by screwing the nuts from underneath the tank. Reattach all the connections and turn the shut-off valve on to run water in the tank.
Fixing the flapper
The third and most important thing to test tank leakage is its flapper. To check its functionality, close the shut-off valve, and observe the level of water. If it drops down, it means the flapper chain is too tight to settle flapper at its place and causing leakage. You have to change the flapper to tackle this issue and you can easily find it from the stores.
Toilet leaking at base – How to fix?
This toilet base leakage was making your slippers wet and ruining your aesthetically designed floor. When you find out that leakage is from the base don’t waste your time. It needs your little effort to pull the base and reseal it. As the base is set on the drain pipe and the connection is sealed with thick wax, when this wax loosens, water seeps from it and makes the toilet leaked.
Open up the nuts or cut with blades if corroded to disassemble the toilet, have a new wax and place the base of the toilet over it. The heavyweight of the base will seal the wax and prevent water to directly drain. Now fix the base by tightening the nuts and the base is leakage-free now.

 All the water tabs and tubing are tightly closed but still, your slippers get wet in the toilet – what’s going on? If you are failed to solve this puzzle, let me help you figure out that your toilet is leaking. Your toilet and its floor are at rot risk as leaking toilets at the base may cause a hell of the bad for your floor. Sooner or later, you would be investing much to fix your floor, and wastage of water is still the same. So, don’t rear this leaking monster and see whether your flushing toilet tank is leaking or it is the base and address accordingly.
 – Reviews and Buyer’s Guide")
 Constantly dripping or flushing much water in the bowl is the main problem toilet tanks face and is silently wasting water without leaving floor impression. It is the fate of every toilet and you will encounter it despite all the maintenance because it is a tank’s machinery issue that is sensitive to bear pressure and fails to work properly.
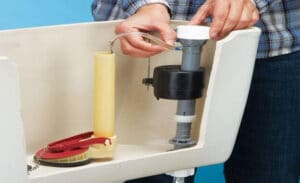 You will see there is a screw at the top of the ballcock that helps to adjust the water level in the tank. If it is not stopping water in the tank you have to check float and see if there is a hole and it lies low in the water. If yes, you need to go for float and rod replacement. It will stop leaking from the tank.
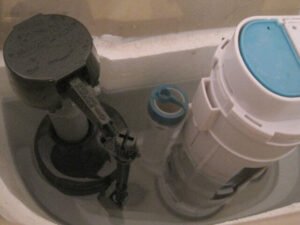 To replace the valve, turn off the shut off valve to cut the water supply in the tank and flush repeatedly to completely withdraw water from the tank. Use a sponge to dry from the base of the tank and disassemble the supply line that connects the ballcock. Unscrew the nuts holding the ballcock and lift the assembly by pushing it up.
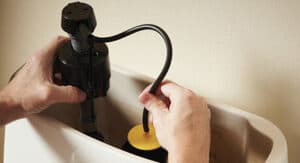 The third and most important thing to test tank leakage is its flapper. To check its functionality, close the shut-off valve, and observe the level of water. If it drops down, it means the flapper chain is too tight to settle flapper at its place and causing leakage. You have to change the flapper to tackle this issue and you can easily find it from the stores.
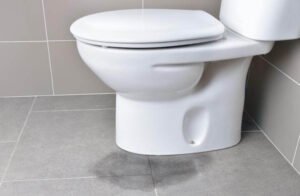 This toilet base leakage was making your slippers wet and ruining your aesthetically designed floor. When you find out that leakage is from the base don’t waste your time. It needs your little effort to pull the base and reseal it. As the base is set on the drain pipe and the connection is sealed with thick wax, when this wax loosens, water seeps from it and makes the toilet leaked.


 Dual Flush Elongated One-Piece Toilet with Soft Closing Seat")
